Getting Started
If you're starting a new React project, we highly recommend using Next.js. It offers excellent support for server-side rendering/prerendering and Incremental Static Regeneration (ISR), which are essential features that Raber relies on for core functionality such as fast publishing and prerendering. In this guide, we will be using Next.js as an example.
Automatic Setup
If you're starting a new project, we highly recommend using this method.
By following this guide, you won't have to write a single line of code or even touch the terminal screen!
console.log("Hello")
红衫资本
Create New Project
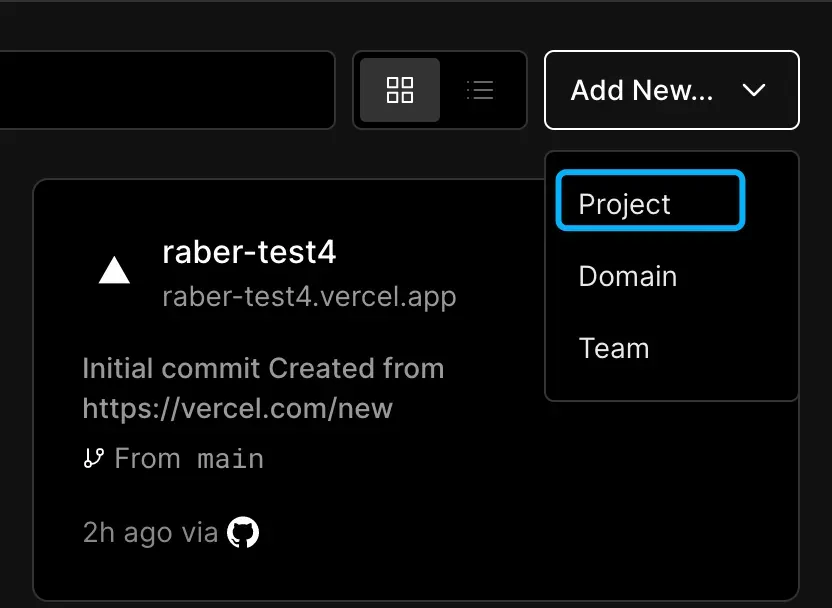
To begin, open the Vercel Dashboard and select “Add New…” → “Project”:
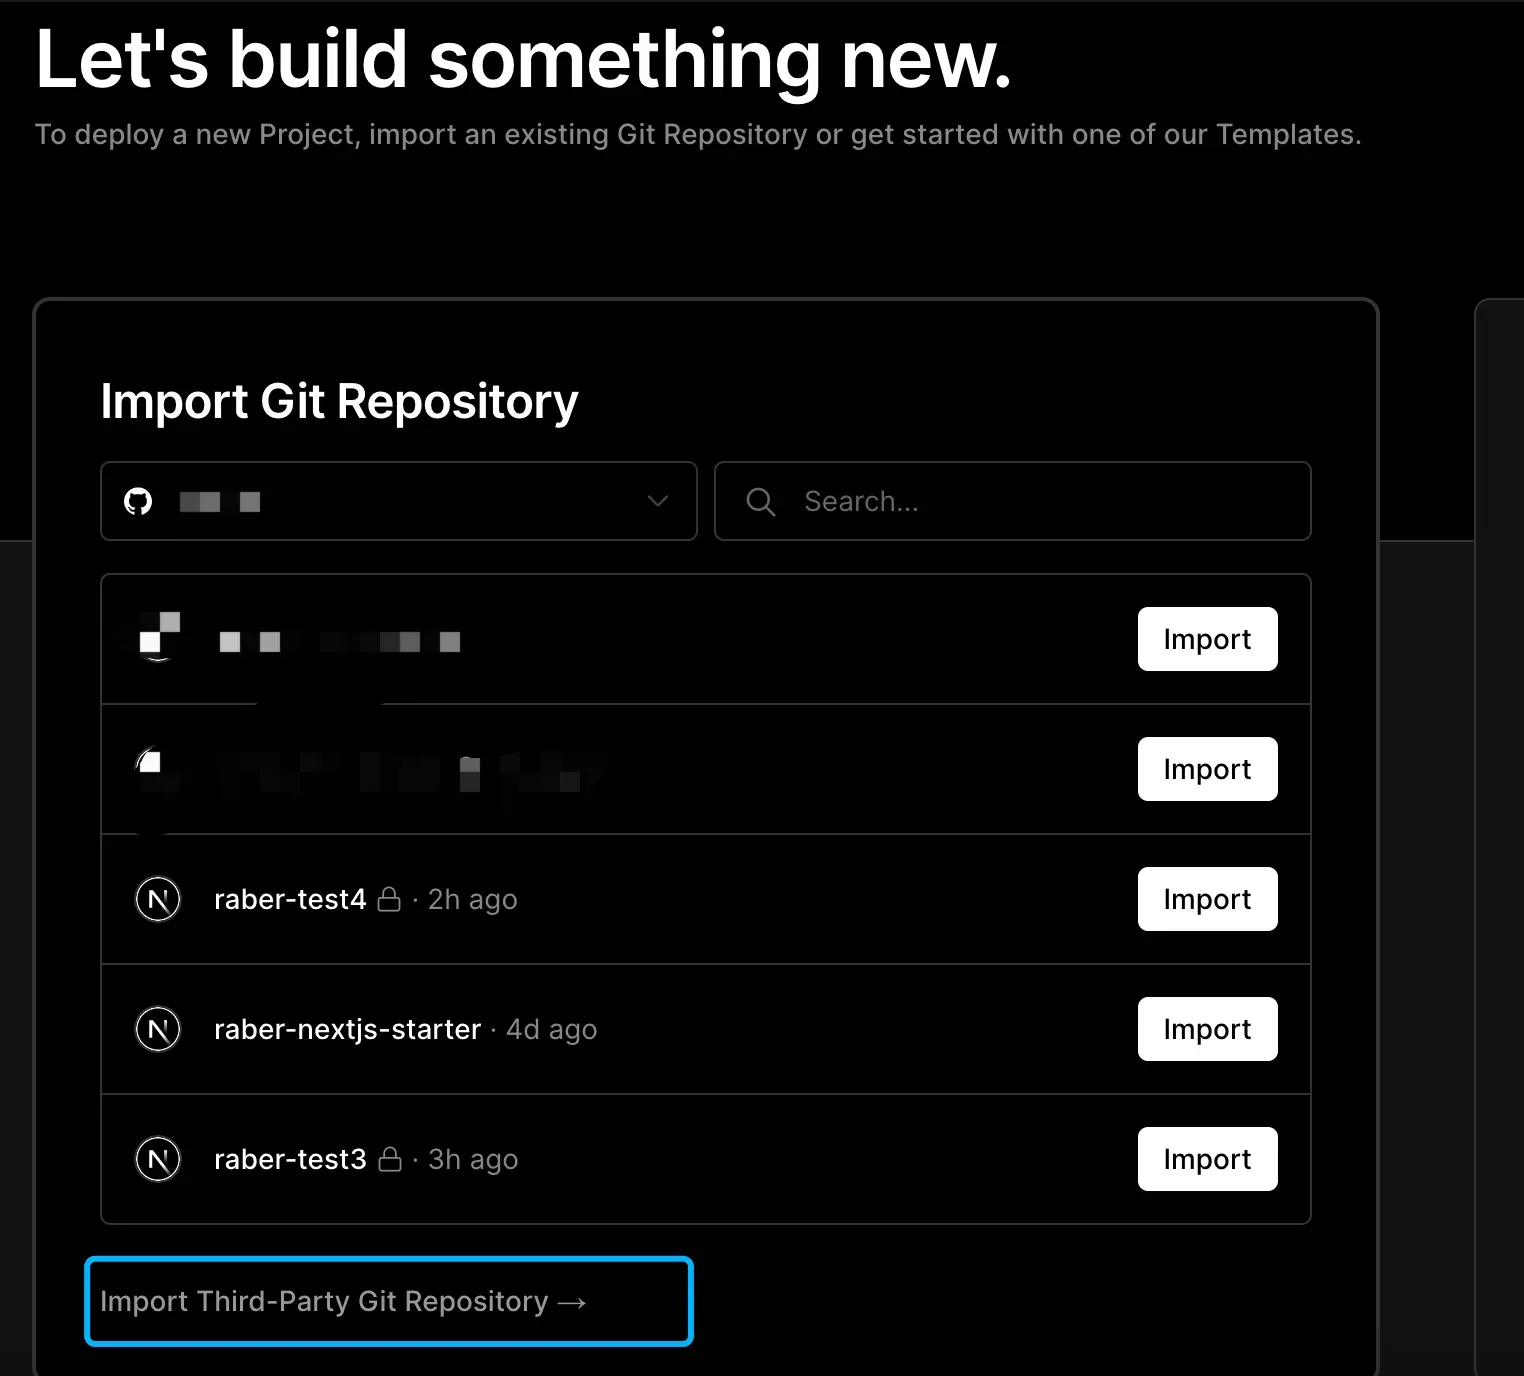
Import Git Repository
Click “Import Third-Party Git Repository”:
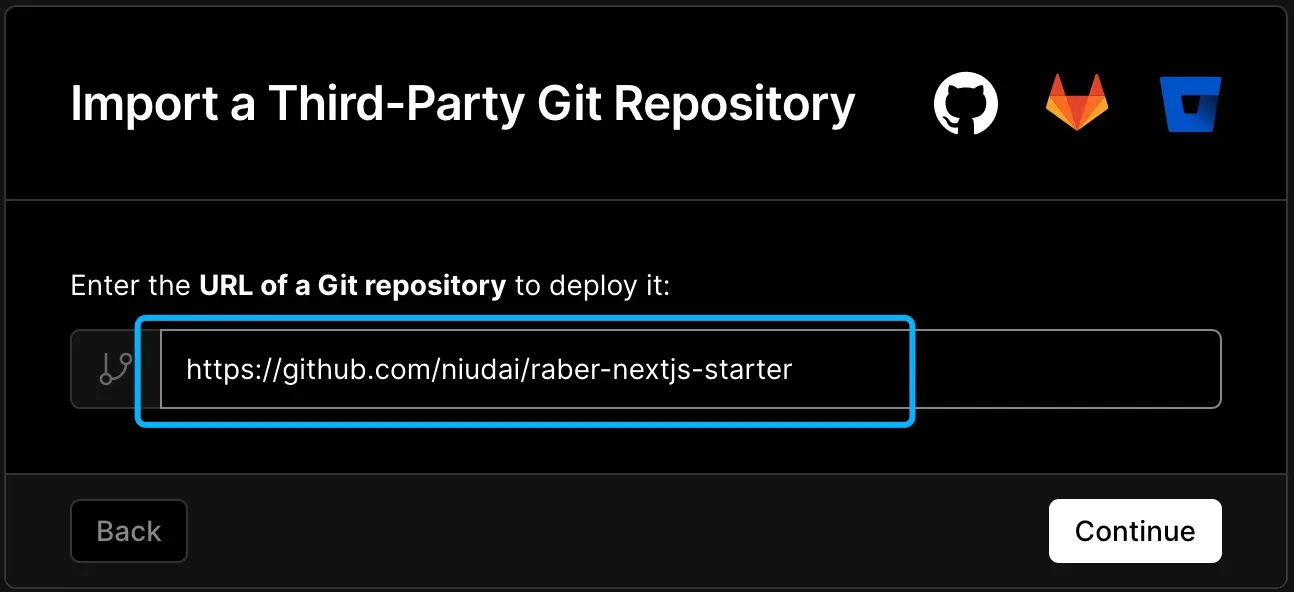
Enter https://github.com/niudai/raber-nextjs-starter in the URL bar below, and then click on "Continue":
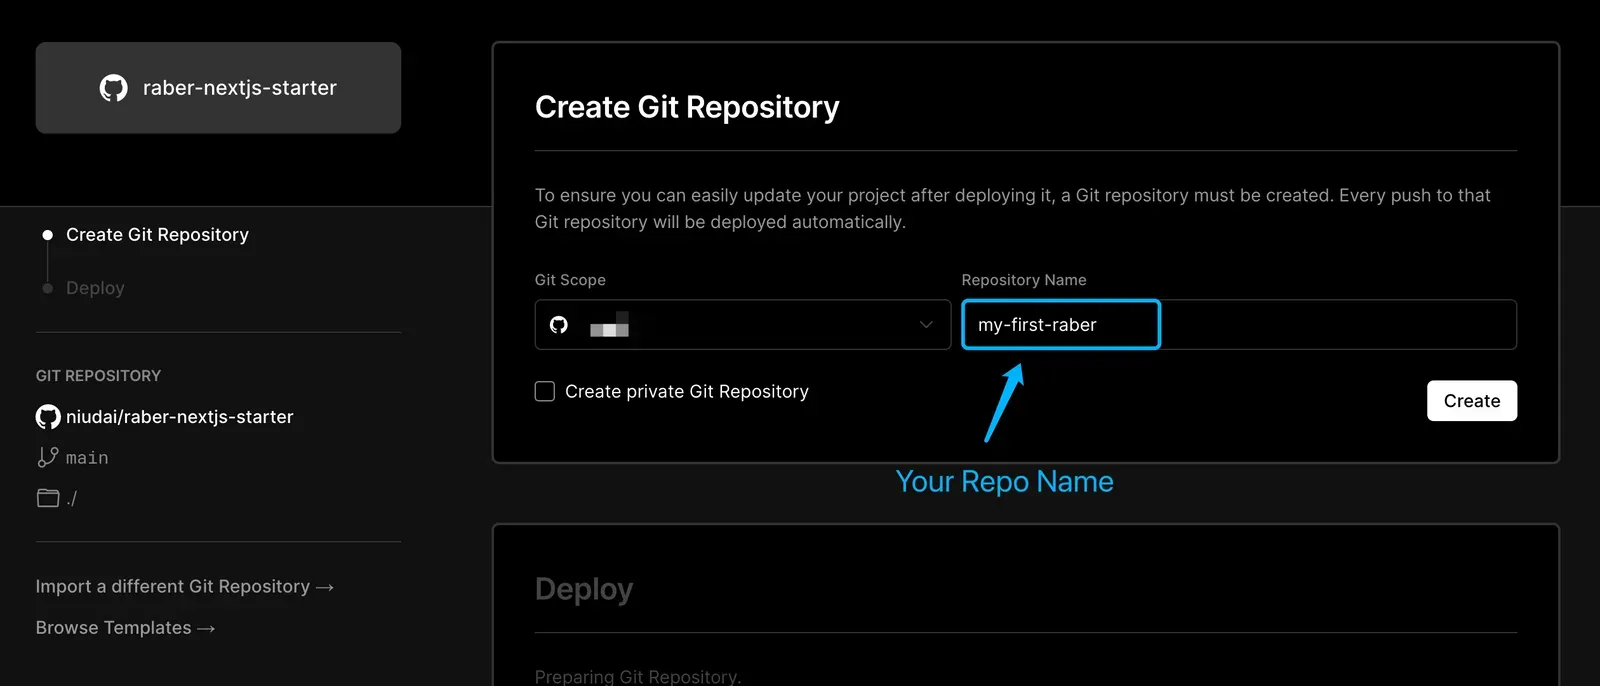
Follow the instructions to create, name and deploy your cloned repository:
Deploy
The deployment process begins as soon as the repository is created and should be completed within approximately one minute.
Your site is almost ready! There's just one more step to make it available.
Configure Public Key
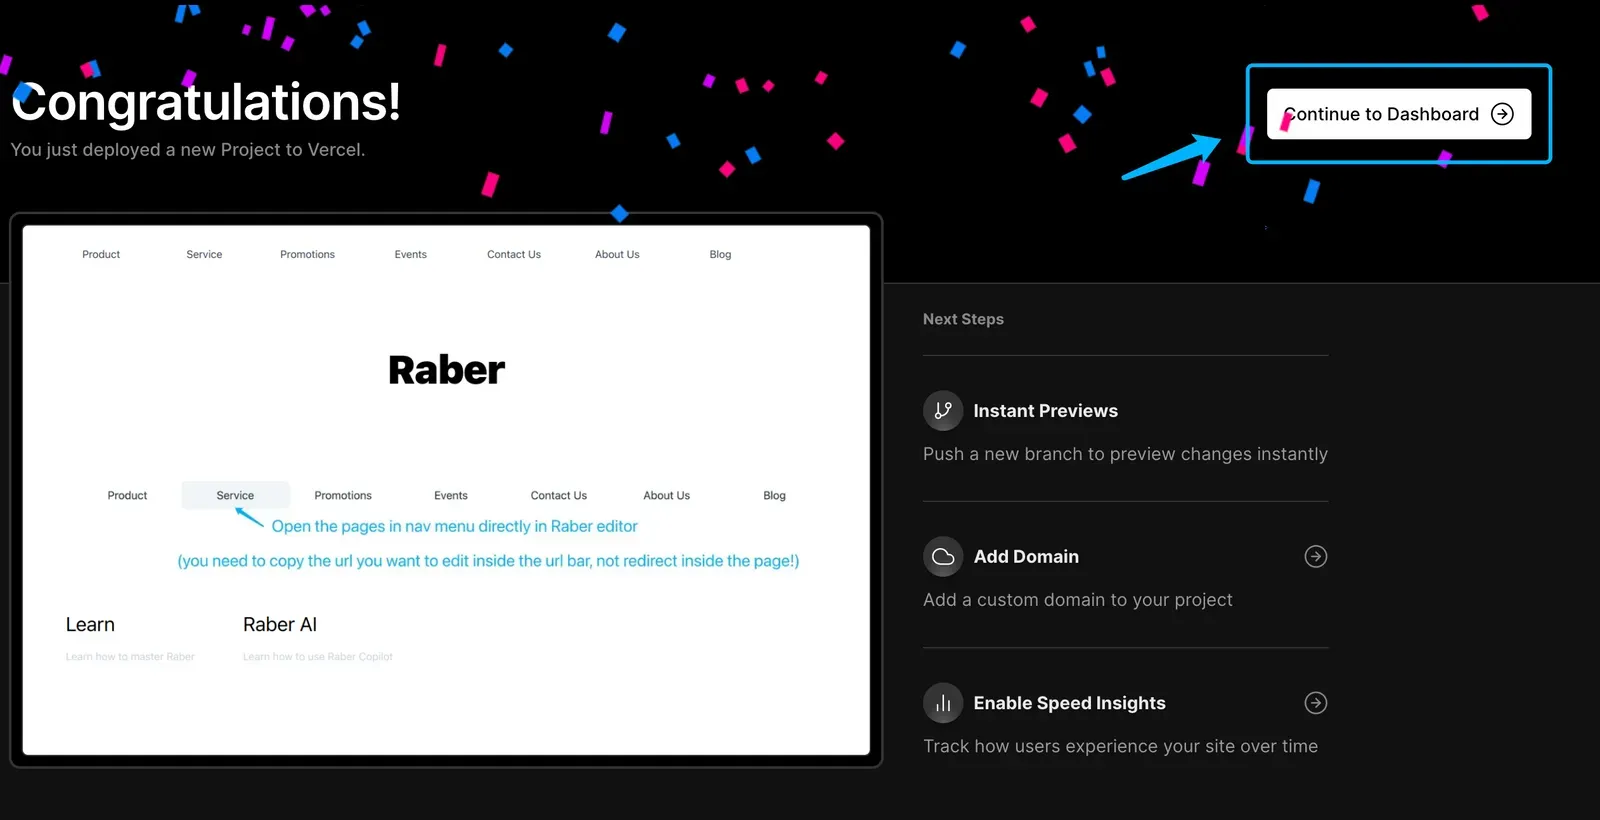
Click “Continue to Dashboard” , and click “Settings” → “Environment Variables”, and add a new Key Value Pair, in which the key is NEXT_PUBLIC_RABER_PUB_KEY , value is your public key. You can see how to get your public key here.
Click on "Continue to Dashboard" and then select "Settings" → "Environment Variables".
Add a new Key-Value Pair, with the key as NEXT_PUBLIC_RABER_PUB_KEY and the value as your public key.

To obtain your public key, click on the avatar located in the header of Raber Editor:

After changes are saved, go to “Deployments”, and click Redeploy:

After the redeployment was done, you can find your online url here:

You can also visit your website's online URL, click on the submenu, and copy the URL into Raber Editor to start editing.

For instance, if your domain is "helloworld-raber.vercel.app", you can access "https://helloworld-raber.vercel.app/product" in Raber Editor to make changes and publish them within seconds.
Furthermore, you can develop your own components or invite other developers to collaborate on the repository you just created.
Manual Setup
You can follow here to create a new next.js project, if you don't have one.
Install Raber SDK
npm install @raber/react
Set Public Key
Click your avatar in the header, and click "Public Key":
Navigate to the pages/_app.tsx file, and add the following code before your page component:
import { initializeApp } from '@raber/react';
import '@raber/react/src/index.css';

initializeApp({
  publicKey: '<your_public_key>'
})
The above code identifies who you are to raber. The publicKey is not a secret and leaking it will not cause any security issues.
It is important to import the CSS file located at @raber/react/src/index.css, as some of raber's core features may not function properly without it.
Helloworld

Add Revalidate API
Create a file named revalidate.ts under the path /pages/api, and add the following code to the file:
import type { NextApiRequest, NextApiResponse } from 'next'

export default async function handler(
  req: NextApiRequest,
  res: NextApiResponse<any>
) {
  try {
    await res.revalidate(req.query.path as string)
    return res.status(200).json({ revalidated: true })
  } catch (err) {
    console.error(err);
    return res.status(500).send('Error revalidating')
  }
}
Raber will utilize this API to update your page when you publish new content. Without this API, you will not be able to update your content on the fly and will need to re-trigger the entire deployment pipeline.
This API leverages the power of Incremental Static Regeneration (ISR), which allows for efficient and lightning-fast updates to your static site. To learn more about ISR and how it works, you can refer to the following resource here.
Integrating Page
Let's create a new page file named "next.js" under the "pages/" directory, and add the following code to the file:
import { Canvas, getPage } from "@raber/react";

export async function getStaticProps() {
	const data = await getPage('nextjs');
	return { props: { data }, }
}

export default function NextJS({ data }: any) {
	return (
		<main>
			<h1>Welcome to Next.js</h1>
			<Canvas data={data} id="nextjs"></Canvas>
		</main>
	)
}
The getStaticProps function is a special feature provided by Next.js, which allows you to fetch JSON data and pre-render a page. When you call getPage('<pageId>') within this function, you will receive the JSON data for the specified <pageId>, which in this case is next.js.
Please note that the pageId must be unique within your account (specified by your public key). If two pages share the same pageId, they will also share the same content.
The <Canvas /> component is the visual editing area, and it requires the same pageId that was used in the getPage function.
Start Building
To start your project, run npm run dev. Once the development server is running (e.g. on http://localhost:3000), open the Raber Editor and paste the URL into the URL bar. Then hit enter to access the page.

Once you have accessed the page via the Raber editor, you will see a blue area within the page. You can drag and drop any component from the left-hand menu into this area to add it to the page.

After dragging a component (such as a text component) onto the page, you can select the component to reveal the balloon toolbar.

The toolbar is grouped into three categories:
- Quick Search - Click this to open the command pallet, the key to access all functionalities.
- Utilities - Property Panel, Drag Handler, Duplicate, Select Parent, et.
- Recent Apps - Up to five apps you recently used, will be empty if you are new to raber, which helps you to access tools more quickly.
To to able to configure the style and alignment of your text, you should click Quick Search and open Command Pallet:
The video demonstrates how to open the Command Palette, search for and open the Font Style feature, configure the font size and weight, and use the Layout Controller to center the text within its container.
You can get literally anything you want from Command Pallet, from apps to commands, such as:
Apps:
- Properties Panel - Configure your component properties, like src of image, content of text, etc.
- Layout Controller - The key app for controlling the layout, use it to control the layout of Box.
- Box Shadow Manager - Use it to manage box shadow effects
- Border Manager - Control border radius, color, width, etc.
Commands:
- Copy/Paste - Copy and paste selected component.
- Download as JSON - Download the json of current page.
- Toggle Preview - Toggle between preview mode and editing mode, you will need this to interact with the real page.
- Select Parent - Select the parent of selected component.
Publish
To publish your changes, simply click on the "Publish" button located in the upper-right corner of the editor, and you will see the prompt if succeed:

you can not visit your http://localhost:3000/nextjs , and you will see the content you just added.

Deploy
It is recommended to use Vercel to deploy your page.
Once your page is online, you can still access and edit it through the Raber editor. You can make changes and publish them as you would when working on localhost.
If the Revalidate API is functioning properly, you can update your content on the fly without having to re-trigger deployment pipeline.
Congratulations!
You just learned how to integrate Raber into your project, you may want to know more about:
📚 Learn how to use your own component.
📚 Learning how to use Visual HTML to fully customize the styling of your components.
📚 Learn how to boost productivity by the power of Raber Copilot